Sunday, June 26, 2016

Adorable Nautical Star with Pam Bray


I hope you all enjoy this fabulous project with design team member Pam Bray. This piece will be darling on display all summer long!
 With the celebration of the Fourth of July right around the corner, how can you not think stars!!!
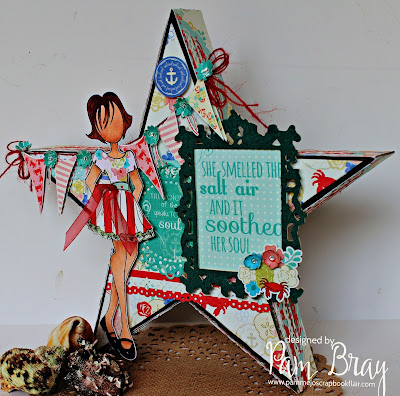
Today I am using a dimensional wood star I purchased at the local craft store to create my Nautical Bliss project with.
 Trace the star on scrap paper and cut out. 
Re-trace on to the pattern paper, cut out and adhere to top of wood star.
 Die cut cork paper and chipboard. 
Layer together. 
Add journal block behind the frame. 
Adhere to top of star.
Add sticker from the Nautical Bliss Paper Package. 
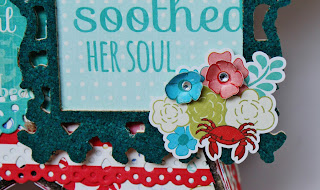
Roll a couple of the sticker flowers using the flower mat, stylus and tweezers. 
Add to frame. 
Add gemstone centers.
 Fussy cut banner flags from Nautical Bliss paper. 
Add to top of star. 
Adhere twine to top of flags. 
Fussy cut like banner flags and add to top of star with pop dots. 
 Punch out small flowers, roll with stylus using flower mat. 
Layer together. 
Add gemstones. 
Adhere to banner.
 Stamp Riley with black ink, color with markers. 
Stamp Riley on Nautical Bliss pattern paper. 
Fussy cut, adhere to Riley.
Add Riley to top of prepared star. 
Add ribbon bow.
 Die cut doilies from Nautical Bliss pattern paper. 
Adhere to paper strips and place on the sides of star. 
I hope I have inspired you to get your Nautical Bliss Paper Package out along with Julie Nutting's Paper Doll Stamps and create a fun Fourth of July decoration. 


Supplies:
Wood Star
Photo Play/Julie Nutting Nautical Bliss Paper Package
Julie Nutting Paper Doll/Riley Stamp
DCWV Teal Cork Paper
Sizzix Mat Board
Sizzix Ornate Frame
Sizzix Hello Daisy
Flower Punch
Red Twine
Flower Mat
Stylus, 
Tweezers
Clear Gemstone
Pop Dots

Saturday, May 28, 2016

Ready for Vacation?

For the Dolls are Everywhere challenge, we thought it would be fun to get our favorite Prima dolls ready for vacation. Summer, after all, is right around the corner! We used the Eileen Hull suitcase die #657124 from Sizzix to get our creative juices flowing. 


Megan is all ready for her cruise! Hmmm, wonder where she's going? Pam used the Nautical Bliss paper collection from Photo Play Paper and just how cute does it look made into that little suitcase? It matches her outfit!


Supplies:
PhotoPlay Julie Nutting Nautical Bliss 12 x 12 Paper Collection
Prima Julie Nutting Megan Paper Doll Stamp
Prima Tales of You and Me Pattern Paper 
Prima French Rivera Flowers
Sizzix/Tim Holtz: Tag & Bookplates #656938
Sizzix/Tim Holtz: Mixed Media #3 #66186
Sizzix Matboard
Copic Markers
DCWV Red Cork Paper
Sheer Red Ribbon
Blue Seam Binding
Spare Parts Metal Handle, Sea Creatures Charms
Pop Dots
Xyron Adhesive
Scotch Glue
Glue Dots
 

 I can't help but wonder where Doreen's doll is headed. The Pheobe stamp is just so sugary sweet in pink tulle, perhaps she's off to Paris! She used the Belle Vie paper collection from Photo Play Paper and a simple black shadowbox frame. A touch of ribbon in a cotton candy shade and an old button completes this piece nicely.


 Jennifer used Gina, one of my latest Prima stamps to create this vintage travel canvas. Wonder where this cutie's going! I'm just gonna guess a fancy European vacay. Maybe Italy. I just love how her tattered old suitcase is covered in travel stickers and those stars!


Thursday, May 26, 2016

Start a Doll Club!

 
I just love how some of the stores are having Doll Club meet-ups for everyone to share their creations! I sometimes get blown away by all the creativity out there! My local store, Wooten's does this once a month and I dropped in last month for their Disney themed day. Not only were they sharing their projects, but some came in mouse ears! If you're interested in doing something like this, ask your local store, (I guarantee you will all spend money so it's worth their while.) :)
Wooten's theme this month is beach and I was inspired to share this because well, it's pretty beachy! Created with my Nautical Bliss paper line from Photo Play Paper. The doll is a mix of my newest beach babes, Suzy, Betsy and Gina. Love how they work together!

Thursday, May 12, 2016

Dolls Are Everywhere!


Marisol, heading to the wine country in Nor Cal

Riley is in Tennessee, the land of great music!

Off to find treasure on the coast of Florida!
 
Oh, yes, they are! We have heard from people on every continent, every culture, playing with paper dolls! From here in the US, down through Central America, all the way to Brazil, over to South Africa, up to Kuwait, Russia, every European country and Australia/New Zealand, on the other side of the world! They are simply, everywhere!
We love this so much that design team cheerleader, Jennifer Olek-Snyder suggested posting your paper dolls on your travels or just in your hometown so we can catch a glimpse of where all these dolls are located. Great idea huh?
My doll, Marisol is getting ready to head up to Northern California. I get to see my son who works on an organic farm and vineyard and can't wait. Marisol is in front of one of the buildings on the farm in this photo. Design team member, Pam is from Tennessee so we quickly placed her on the map and Jennifer's scruffy little pirate is vacationing in Florida. Get the idea? I would love to see our beloved dollies all over the world in the next couple of months and the timing is perfect for summer vacations!
Please post on the Facebook Julie Nutting Doll Club or Julie Nutting Paper Dolls and Other Fun Stuff pages for all to see. You can also tag me on Instagram @julie_nutting.

Saturday, May 7, 2016

Jennifer's Shaker Card Tutorial

In case you missed this, I thought I'd share design team member, Jennifer Olek-Snyder's tutorial of this darling shaker card. She shares all the things NOT to do so you can have the perfect card the first time around. Thanks, Jennifer!
Shaker Card Simple DIY Instructions
I created a few quick and easy shaker cards for Make-N-Takes and group projects featuring the Prima doll stamps created by Julie Nutting.  As a result, a few folks asked me to compile some easy DIY instructions so they could use the technique for group projects as well.  

I made two cards - a boy and a girl card.  They have different sentiments and the boy has a mat background - but otherwise the techniques are the same.  

If you scroll down, I share my DIY instructions as well as some pit falls and "fails" that I have overcome after some dismal shaker card attempts.   I offer tips for shaker success.  

This little darling is Keira all gussied in purple and pink.     

Here is the sweet boy, Toby.  


These are my instructions: 

 My card is about 6.25" x 5" big.  I do buy pre-folded card/envelope sets  because I love the convenience.  I also love having envelopes that fit.  I hate trying to hunt down envelopes for irregular sized cards.  

Step 1.   I knew I wanted to use watercolor pencils for my card so I used watercolor paper for the window and doll stamp.  I cut a piece of watercolor paper to fit my needs.  I do think watercolor paper works best when using watercolors.  The paper doesn't rip and tear when it gets wet as patterned paper or cardstock may do. 

My shaker card "fail" and my tip for success: 
I punched first then I stamped the doll image.  The punch was first because then I could determine exactly where to add the stamp.  I tried stamping first and the poor sweetheart lost an arm.   


Step 2.   Every shaker card needs a "sandwich layer".   I found that Fun Foam makes for great sandwich material.  It's super easy to cut, light weight, has a consistent flat surface and is very inexpensive.   

My shaker card "fail" and my tip for success: 
So why didn't I use cardboard?  Well I tried a shaker card using cardboard.  Ya know those cool little tunnels in the corrugation of the cardboard?  Well, they become less cool when the beads and shaking material fall out of the tunnels of the cardboard onto your floor.  An empty shaker card looks ridiculous. 

So why didn't I use foam tape? Many reasons actually.  

  • Foam tape is much more expensive than a sheet of Fun Foam.  
  • With my window being more circular, it's so much harder to create a good seal with foam tape so that shaker material doesn't fall out.  
  • I need to use a lot of foam tape to cover the surface of the card and provide support.  If I do not have a flat surface for the top layer, I may get dips and ripples in my top layer.  Man I hate dips and ripples in my cards.  Hate that!  Plus I am too cheap to waste all that foam tape.  


Step 3.  I used the punched window as a template for tracing onto the foam.

My shaker card "fail" and my tip for success: 
Do not add the window to the card until you create your foam template and know where to cut the foam.  Yeah - I've messed up a few times and glued my window to the card before tracing.  Let's just say I am not good at guessing where to cut the perfect hole.  haaaaa!  Good thing Fun Foam is cheap.  

Another tip....if you are making a bunch of these, it's usually best to custom cut the foam for each card.  Unless your punching is spot on perfect for every card, you are going to run into foam problems.  Once again...I appreciate the fact that Fun Foam is cheap after 5 cards for Make -N-Takes didn't fit properly.  


Step 4. Cut the foam bigger than the traced lines.  Now is not the time to bother with perfection.  No one will see the foam underneath.  
Step 5.  Glue the foam to the base layer of the card.  Make sure you have added a sufficient amount of glue around the circle of the foam.  You need to create a good seal so you do not lose your shaker material.  

I like using a strong durable glue that works well with many surfaces. I am using Beacons 3-in-1 glue.    This also dries crystal clear.  It really is remarkable. 

My shaker card "fail" and my tip for success:   Do not try outsmarting the Fun Foam by pulling out your glue gun and using it to adhere the foam to the card.  The foam will have the last laugh and you'll be thankful Fun Foam is cheap.  haaaaaa.  

The foam does melt and warp when using the heat gun or hot glue gun.  I've done it.  And yes.....I was thankful  Fun Foam was cheap.  


Step 6.  Now you can add anything you want inside the window.  I added glass beads.  You can add sequins, trinkets, crystals, and anything that moves freely.  

My shaker card "fail" and my tip for success: 
Is glitter ok to use?  You can certainly add glitter but it does have a tendency to stick to the acrylic window from static.  When I used glitter for the first time, all I saw was the glitter.  It stuck to the acrylic like a glitter blizzard.  I just could not get it to shake off.  

You can wipe the acrylic with an Embossing Buddy (a little pillow filled with a cornflour like substance to remove static from cardstock).  You can also wash the acrylic with soap and water which will help.  

I'm too lazy to do either of those so I pick shaker material that I know will shake.  


Step 7. Now's the time to find some acrylic for the window.  I love to save acrylic from packaging.  Sometimes embellishments come with an acrylic package.  I save everything with acrylic; produce comes in acrylic ( lettuce, strawberries, tomatoes...whatever), baked good come in acrylic (YUM), below was a CD set that came in wonderful fabulous reusable acrylic.   I save it all!

Step 8.  Once again, I pulled out my strong glue because I know it will hold my acrylic in place.   Add glue all the way around the window to create your seal.   


Step 9 Attach your window to the card.  Add glue around the window to create a secure seal. 

Warning Warning Warning...add your shaker material before you close up the window.  While that should be absolutely obvious, this remains the single hardest step for me to remember.   I cannot tell you how many times I have closed up an empty shaker card.  sheesh.  I tend to get so excited that I am just about finished that I plumb forget to add the beads.  I'm just telling it like it is. 


Step 10  Decorate your card as you wish.  
Step 11 I used Prima's watercolor pencils and waterbrush to add pops of color to my doll stamp.  I also added Prima flowers and a pretty gingham ribbon.  


And here are a few more photos of the  successful shaker cards.  


Thanks for stopping.  I treasure your support and comments.


Products
910808 Prima Julie Nutting Doll Stamp - Keira
910969 Prima Julie Nutting Doll Stamp - Toby
846961  Prima Epiphany 6x6 paper pad
585891  Prima Watrerbrush Pen set
576714 Prima Mixed Media Watercolor Pencils - The Basics
712396 Prima Wildflowers Pillar Pack Botanical Flower Mix
571726 Prima Lucido Spring Flower Mix
Fun Foam
Beacons 3in1 glue
Pre-folded Cards
Gingham trim
Glass Beads
stamps
Ink

Friday, April 29, 2016

Meet My New Design Team!


Pam Bray - Tennessee
 
Her card designs swept me off my feet. I fell instantly in love with her use of my Belle Vie paper collection from Photo Play Paper. Elegant but not overdone. Perfect in composition...I could just eat these! She's on several other design teams including Graphic 45 and Sizzix. How lucky am I? I look forward to her designs and can't wait to see her entrance into my paper doll world!


Doreen Nunez - California
 
Doreen's tags are exquisite. Her color combos and that jar of pearls just captured my heart. She practically lives next door and told me she took a class with me years ago, pre-stamps! She has and continues to teach in our local stores. I am looking forward to many future creative meetings with her and can't wait to see her new designs!


Last but certainly not least, Jennifer. She captured my heart a few years ago while she was on the Prima Design Team. Not only is her talent and creativity undeniable, but she is everybody's cheerleader and my biggest. She posts the most encouraging comments on Facebook and well, just makes everyone feel so good. I love the simplicity of her layout and the incredible details she puts forth in every project, the draping of the net, the curling of the waves and of course the layering of the dress. I may have paper pieced and layered something pretty under the dresses but she was the master inventor of the type of layering you see here. I am so excited to have her on the team! Oh, did I forget to mention her sense of humor? You will just have to wait and see!
 
Stay tuned for some wonderful stuff coming from these 3!

Wednesday, July 22, 2015

Coloring your Dolls

Recently, Prima Marketing and I came out with some alcohol marker palettes to be used with my doll stamps. Now, I don't claim to be one of those amazing marker artists out there, let's just get that clear.
As you all know, I love my text paper...any kind of text paper...scrapbook paper, newspaper, old maps and documents. You name it, that's what I like to stamp my dolls on. But I have to admit, I like a little shading. It just adds that touch of depth, that feeling that hey, maybe I am a real artist! The only markers that gave me the look I wanted were alcohol markers and we know how expensive and well for me, how overwhelming it is to go through all the colors to find the exact one I needed.
 
These markers come in many palettes for skin and hair tones as well as some basic colors that I like to use for shading the clothes. Remember the reason I have always used text papers since I started all my doll stuff back in 2007...I didn't have to be perfect at shading the skin. I didn't have to be a real artist! I could be the totally imperfect artist that I am and get away with it. So here are my tips for using theses new markers my way.
These markers go perfectly with the Buff Paper Pad by Prima. All different skin tones come in one handy A4 pad.
Be warned though, not to depend on the numbers on the markers to figure out the different shades. We do not number them. They come that way from the manufacturer. There is a reason, a very technical one but I am not here to bore you with that. Just always test your colors first.


My first tip of the day...I cut off the top of the package so the markers slip right out. I keep them in their packages so I know the light skin tones from the medium ones, etc. I also write the numbers on the back just in case I get mixed up. I keep all the sets in a small handled shopping bag so I can see all the colors at a glance. It slips right under my desk.


I stamp my image with Archival ink and give it a few seconds to dry. I am using the Light Skin palette for this on the light tone paper from the Buff paper pad. I picked a side, the left and shaded it with the medium tone marker, #83. You could use the darker tone, #84 for this step if you want it a little bit more pronounced. There is no right or wrong way and I encourage you to play with the colors to see what you like.


I used the lightest tone marker, #82 to blend the darker shade into the paper. Keep this particular color handy...I use it a lot. I don't do any of the fancy schmancy flicking, I just simply blend the colors. Bamm! Skin is done! Easy peasy.


Let's make Candie a blond today. Using a more traditional approach, I brush the lightest tone of the blond palette, #17 in the center of all the hair sections. I then brush the medium tone in the empty spaces. I like to stagger my edges for texture. I blend the colors with my lightest pen from the light skin palette # 82. There is also a blender pen but for some reason I just prefer that light pen to blend with. I place just a tiny bit of the darkest tone #19 at the roots, top of bangs and the side curls and blend again. Done!


Hair and skin complete, but oh no! I forgot....


Cheeks! We have just the set for that... Dolled Up! I used the lightest shade #1 and blended it with my # 82 from the light skin set. I think she's now ready to get dressed! This set is a perfect example of the numbering system not being in the order we think it should be in so be careful.

There are sets in different colors too, greens, teals, purples, reds. I love to shade the folds in the dresses to give them some dimension. I stamped the dress on a new paper from the Garden Fable collection and I'm going to use the Dolled Up set because of their pink tones. On the left side of the dress, I used the darkest tone, #3 and on the right side of the dress, I used #6, the medium tone just to show you the difference. I blended again with The #82.

All dressed and ready to go! I did her shoes with the Brunette set. You can see I am not the proficient alcohol marker artist but these pens give me just the right shades for what I want to achieve with my dolls. Notice how I shaded just the left side of her skin. Simple, fast and oh so cute!

Sorry, my lighting is terrible today but I wanted to show how nicely using the dark tones work with the Buff paper pad. I used only one color and simply blended it into the paper.